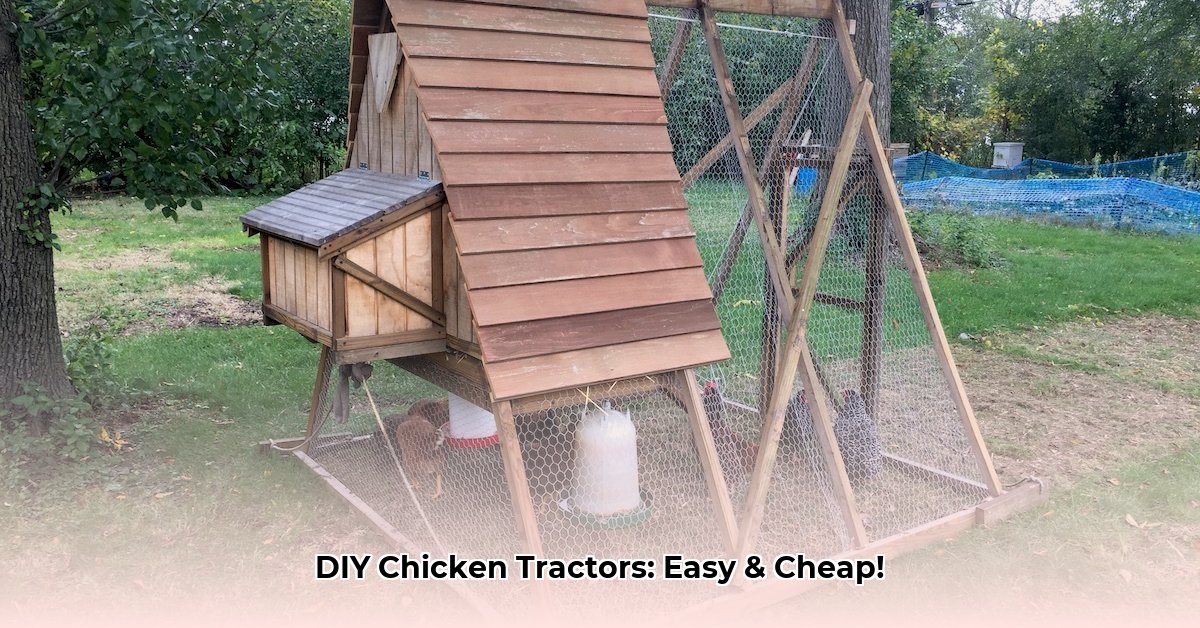
Building your own A-frame chicken tractor is a rewarding way to provide your hens with a safe, mobile home while minimizing your environmental impact. This guide offers three options, catering to different skill levels and sustainability goals. Whether you're a seasoned DIYer or a complete novice, you'll find a plan here to suit your needs. For even more detailed plans, check out this helpful resource.
Option A: The "Quick & Easy" A-Frame Chicken Tractor
This option is perfect for beginners, prioritizing simplicity and speed of construction. It's an ideal introduction to chicken tractor building, proving a cost-effective and straightforward path to fresh eggs.
Bill of Materials (Option A):
| Material | Quantity | Notes |
|---|---|---|
| Untreated 2x4s | 8-10 | Standard size, readily available at most home improvement stores. |
| Chicken wire | 1 roll (approx. 50 sq ft) | Sufficient for sides and back; you might need more depending on the size of your coop. |
| Heavy-duty hinges | 2 | For the door; choose durable hinges designed for outdoor use. |
| Wood screws | 1 box (assorted sizes) | You'll likely need a variety for different joints. |
| Hammer | 1 | Optional, for extra support if using nails in conjunction with screws. |
Step-by-Step Instructions (Option A):
- Cut the Wood: Measure and cut your 2x4s to the desired dimensions for your A-frame. Many home improvement stores offer cutting services. Aim for a simple isosceles triangle shape – two long sides and a shorter base for optimum stability.
- Assemble the Frame: Use wood screws to securely join the 2x4s, forming the A-frame structure. Pre-drilling pilot holes will help prevent the wood from splitting.
- Attach the Wire: Securely fasten the chicken wire to the frame using staples or wire. Ensure there are no gaps where chickens could escape.
- Construct the Door: Create a simple rectangular door frame from more 2x4s and cover it with chicken wire. Attach this door to the A-frame using the hinges.
- Build a Ramp: Chickens need easy access! Construct a small ramp using leftover wood or other suitable material, leaning it against one side of the coop for easy entry and exit.
Tips and Tricks (Option A):
- A wider base increases stability. Consider using longer 2x4s for the base.
- Utilize longer screws for stronger joints.
- Adequate ventilation is essential. Leave some space between the bottom of the wire and the ground to allow for airflow.
Option B: The "Enhanced" A-Frame Chicken Tractor
This option builds upon the basic design, incorporating features for greater durability, comfort, and mobility.
Bill of Materials (Option B):
| Material | Quantity | Notes |
|---|---|---|
| Treated 2x4s | 12-15 | Provides better weather resistance and longevity. |
| Heavy-duty wire | 1 roll (approx. 75 sq ft) | Stronger than standard chicken wire; consider welded wire for added strength and security. |
| Heavy-duty hinges | 2 | For lasting durability. |
| Plywood (1/2 inch) | 1 sheet (4x8 ft) | For the nesting box. |
| Small wheels | 4 | For easy movement; swivel casters enhance maneuverability. |
| Screws, Nails | As needed | Get a selection for different applications. |
Step-by-Step Instructions (Option B):
- Build the Frame: Follow the steps from Option A, but use treated lumber for increased weather resistance.
- Construct a Nesting Box: Cut the plywood to create a simple nesting box for your hens to lay eggs. This improves egg collection and hygiene.
- Attach the Wheels: Securely fasten the wheels to the base of the A-frame for easy mobility. Ensure even weight distribution to prevent tilting.
- Add Roosting Bars: Chickens appreciate roosting areas. Add one or two horizontal 2x4s inside for resting.
Tips and Tricks (Option B):
- A plywood or corrugated plastic sheeting roof provides additional weather protection.
- Pre-assembling parts before attaching them to the main structure simplifies the process.
Option C: The "Sustainable" A-Frame Chicken Tractor
This advanced option prioritizes environmentally conscious material choices while enhancing functionality.
Bill of Materials (Option C):
| Material | Quantity | Notes |
|---|---|---|
| Reclaimed lumber | As needed | Check local salvage yards or demolition sites. Ensure it’s sound and free of rot or pests. |
| Heavy-duty welded wire | 1 roll (approx. 100 sq ft) | Extremely strong and durable, excellent for long-term use. |
| High-quality hinges | 2 | Choose durable hinges designed for outdoor use. |
| Eco-friendly stain/sealant | 1 quart | Protects the wood and enhances its appearance. |
| Optional: Tarpaulin | 1 | For additional weather protection |
Step-by-Step Instructions (Option C):
- Source Materials: Find reclaimed lumber, inspecting carefully for soundness.
- Prepare the Wood: Clean the wood and apply an eco-friendly sealant to protect it.
- Build the Frame: Create a sturdy A-frame structure using the reclaimed lumber.
- Enhance the Nesting Box: Construct a larger, more comfortable nesting box, possibly with a removable bottom for easy cleaning.
- Add Advanced Features: Consider a sliding door system or built-in ventilation for climate control.
Tips and Tricks (Option C):
- Minimize material waste while designing your coop.
- Adding a tarp roof offers excellent protection against rain and sun.
Maintenance and Regulations
Regular inspection and maintenance are crucial for the longevity of your chicken tractor. Check for damage (especially to the wire) and repair any weaknesses promptly. Always confirm local ordinances regarding backyard chickens and structures before construction to ensure compliance.